
Tuesday, March 12, 2013
Burberry Inspiration
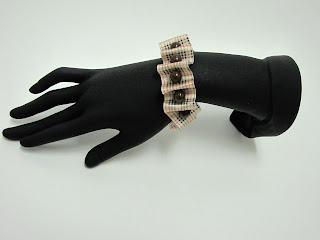
I have Burberry perfume. It's quite a strong smell but also so distinctive and beautiful. I was looking through some of my materials the other day and realized I had ribbon that resembled Burberry a lot. So... I made some products from the inspiration. :)


Monday, March 11, 2013
Wedding Jewelry and Bouquets
A really fun part of the wedding is choosing the wedding jewelry and accessories.Will your bridesmaids be matching, or are you choosing jewelry based on their personalities? Will the jewelry you wear represent you?


Saturday, March 9, 2013
Friday, March 8, 2013
Recycled plastic shampoo bottle jewelry tutorial
I recently finished another bottle of shampoo. As I was about to throw it in the garbage I realized how beautiful the sheen and colors were on the bottle and thought... "hmmm I must be able to do something with that!" So of course I made some jewelry. :)
This is a very simple and easy craft for adults or youngsters.
What you need:

This was my shampoo bottle.
Step 1: Rinse the bottle as well as you can.
Step 2: If the tops and bottoms are harder plastic than the middle area like mine was you will need to cut them off with an exacto knife. Cut just above and below the bottom and top rims to save as much plastic as possible.
Step 3: Cut a slit all the way down the bottle until you can open it up like a book.
Step 4: Rinse the bottle again. My bottle had left over suds. Dry it.
Step 5: Shape cutting. I didn't want to ruin any side of the plastic I had so instead of tracing on the bottle I just cut around a paper shape I had made.
Then assemble your masterpieces!
Here's what I made:
This is a very simple and easy craft for adults or youngsters.
What you need:
- Pretty looking shampoo bottle (used and empty... it's not eco friendly to waste)
- Scissors
- Patterns of your choice
- Exacto knife (if the top and bottom of the bottle are hard)

This was my shampoo bottle.
Step 1: Rinse the bottle as well as you can.
Step 2: If the tops and bottoms are harder plastic than the middle area like mine was you will need to cut them off with an exacto knife. Cut just above and below the bottom and top rims to save as much plastic as possible.
Step 3: Cut a slit all the way down the bottle until you can open it up like a book.
Step 4: Rinse the bottle again. My bottle had left over suds. Dry it.
Step 5: Shape cutting. I didn't want to ruin any side of the plastic I had so instead of tracing on the bottle I just cut around a paper shape I had made.
Then assemble your masterpieces!
Here's what I made:


Thursday, March 7, 2013
Pop can jewelry
I recently came into possession of some pretty looking pop cans and couldn't let them go to waste. Pop cans can be recycled into many cool crafts not just jewelry. So go ahead and start recycling :)


This is a great craft to do with your tweens and teens, but it can be dangerous. Using rubber dish gloves, workers gloves or even gardening gloves would be safer.
I collected some colorful cans, cut them and washed them well with soap and water.


Draw a pattern on your aluminum with a marker. To reduce waste, try filling up as much space as possible. I chose to draw 3 sizes of flowers. If you'd like, cut out a cardboard or paper piece of the image you'd like to have on the can and trace it.

Now cut out your shapes. Sharp scissors work best, the smoother the cut the less fraying and rough edges you'll have in the end.

Carefully feel the edges, if you've cut well enough sanding won't be necessary. If there are rough edges simply sand them down. I like to use a nail file.
I pierced the centers of each of the flowers and one in the top of a petal in the largest flower. Piercing the metal can be done with a sewing needle or push pin. I placed the flowers onto a cardboard box so that I would not pierce the table. Now you can shape your flowers, I rolled up the edges using a pin.
I assembled my flowers into earrings.
 |
| Buy |


If you are lucky enough to possess a Sizzix machine this can be easily accomplished without a lot of effort, and with many different shapes.
Finding the perfect dress
If you are anything like I was when I was about to be married, you are marathoning shows like "Say yes to the dress" or "Bridezillas". Well guess what? The obsession usually doesn't go away after the wedding. Yup, I'm still in love with wedding shows. Watching other people fail on "Bridezillas" allowed me to see other people's mistakes first hand so I could avoid them.
So here are some tips I have for you on finding your perfect dress.
First off, give yourself time. Dresses can be taken in if you are dieting. Leaving your dress to the last minute can be deadly (hair falling out stressful!) Give at least 1 month for alterations. That includes taking it in, letting in out, hemming, extra beading. Is it vintage? Used? Well give yourself at least another 3 weeks for cleaning once the alterations have been done! I left my dress almost last minute, I definitely didn't realize how much effort had to be placed into a wedding dress.
Second thing, if you are going to bring people to your dress fitting make sure they want to come! Forcing someone, begging them or dragging them along will only result in them becoming annoyed and rushing you into a decision. Personally watching someone change in and out of a wedding dress for me is frightfully exciting! But not everyone thinks this way.
Third, when shopping for your wedding dress it's best to have an appointment. Not only will the sales ladies give you more attention, but some places may not even allow you to shop. DO NOT wear makeup to choose your wedding dress or to a fitting. Cleaning a wedding dress can cost upwards of $200, do you really have this in your budget? It's best to wear your hair down. Your hair, no matter what you do will be tousled and ruined! So getting an updo in your gown before the fitting, not such a good idea! Listen, makeup and hair updos look the same in the dress as they do out of it! If you need to see the whole ensemble, try cropping pictures.
Fourth, DO NOT let anyone pressure you or rush you. If that sales woman wants to make a sale, she will work with you till you are satisfied. If your bridesmaid, best friend or mother are getting bored, let them leave! The only opinion that matters is your own! Do I feel good in this dress. The sales lady is NOT someone to ask if you look good in that dress! She is trying to sell you on anything she possibly can, this is her job!
Fifth, bring a camera. It's always a good idea to take a picture in every single gown you try on, good or bad. Not only are they fun to look at after the wedding, but it's a good guide on what you are looking for. Sometimes looking in the mirror just doesn't capture exactly what you look like to others. If you think that large bow on your butt looks cute in the mirror, look at it again in a picture!
Six, remember this isn't the only dress shop. Go to many dress shops cause you may never know what you might find.
Seven, know what you want. You don't have to know exactly what you want, but know key things. For example, I knew I wanted a princess dress. Crazy big and crazy extravagant. I thought, hey this'll be the only time I get to be a princess, milk it! I also knew I wanted a heart shaped bust and a corset back.
Eight, wear a GOOD bra. If you are wanting to have a strapless gown, wear a strapless bra! If you want a backless gown get the boob tape! That perfect bra can help shape your whole upper body in the dress. Also, just for less embarrassment and better hygiene wear good panties. NOT thongs or g-strings.
Last but definitely most important, stick to your budget! When I went shopping for my dress, I told the sales woman my highest point was $1000. The first dress she put me in I turned around to grab the tag and saw that it was $1500! I was angry! Don't let the sales woman pick out dresses that are over your budget cause if you can't afford it, but love it, you will regret it in the end. Remember this budget is only for the dress, there are many alteration fees and cleaning fees that come after choosing a dress.
Here's my journey:
I was very close to buying this dress. It was $1100, $100 over my budget and the sparkle belt was $150! My step mom, cousins and aunt told me they didn't see the spark in my eyes and that I shouldn't settle. So they took me to another bridal shop they had seen down the road. (I did not have an appointment for this shop). My aunt is very good with her words, so after some convincing she got the sales women to allow me to shop and dress myself.
This was the first dress I put on:
This dress was already lower priced than all of the other ones in the first bridal shop we went to.

I felt like I was wearing "Belle's" dress from Beauty and the Beast. It had the perfect amount of sparkles, ruffles, body and shine.
So here are some tips I have for you on finding your perfect dress.
First off, give yourself time. Dresses can be taken in if you are dieting. Leaving your dress to the last minute can be deadly (hair falling out stressful!) Give at least 1 month for alterations. That includes taking it in, letting in out, hemming, extra beading. Is it vintage? Used? Well give yourself at least another 3 weeks for cleaning once the alterations have been done! I left my dress almost last minute, I definitely didn't realize how much effort had to be placed into a wedding dress.
Second thing, if you are going to bring people to your dress fitting make sure they want to come! Forcing someone, begging them or dragging them along will only result in them becoming annoyed and rushing you into a decision. Personally watching someone change in and out of a wedding dress for me is frightfully exciting! But not everyone thinks this way.
Third, when shopping for your wedding dress it's best to have an appointment. Not only will the sales ladies give you more attention, but some places may not even allow you to shop. DO NOT wear makeup to choose your wedding dress or to a fitting. Cleaning a wedding dress can cost upwards of $200, do you really have this in your budget? It's best to wear your hair down. Your hair, no matter what you do will be tousled and ruined! So getting an updo in your gown before the fitting, not such a good idea! Listen, makeup and hair updos look the same in the dress as they do out of it! If you need to see the whole ensemble, try cropping pictures.
Fourth, DO NOT let anyone pressure you or rush you. If that sales woman wants to make a sale, she will work with you till you are satisfied. If your bridesmaid, best friend or mother are getting bored, let them leave! The only opinion that matters is your own! Do I feel good in this dress. The sales lady is NOT someone to ask if you look good in that dress! She is trying to sell you on anything she possibly can, this is her job!
Fifth, bring a camera. It's always a good idea to take a picture in every single gown you try on, good or bad. Not only are they fun to look at after the wedding, but it's a good guide on what you are looking for. Sometimes looking in the mirror just doesn't capture exactly what you look like to others. If you think that large bow on your butt looks cute in the mirror, look at it again in a picture!
Six, remember this isn't the only dress shop. Go to many dress shops cause you may never know what you might find.
Seven, know what you want. You don't have to know exactly what you want, but know key things. For example, I knew I wanted a princess dress. Crazy big and crazy extravagant. I thought, hey this'll be the only time I get to be a princess, milk it! I also knew I wanted a heart shaped bust and a corset back.
Eight, wear a GOOD bra. If you are wanting to have a strapless gown, wear a strapless bra! If you want a backless gown get the boob tape! That perfect bra can help shape your whole upper body in the dress. Also, just for less embarrassment and better hygiene wear good panties. NOT thongs or g-strings.
Last but definitely most important, stick to your budget! When I went shopping for my dress, I told the sales woman my highest point was $1000. The first dress she put me in I turned around to grab the tag and saw that it was $1500! I was angry! Don't let the sales woman pick out dresses that are over your budget cause if you can't afford it, but love it, you will regret it in the end. Remember this budget is only for the dress, there are many alteration fees and cleaning fees that come after choosing a dress.
Here's my journey:
 |
| Not right at all! |
 |
| A little sparkly and poof. |
 |
| My cousin wanted me to have this one, but I didn't want mermaid. |
 |
| This was my choice. It was ruffly, princessy and had the heart cut top I wanted, just wasn't sparkly enough. |
 |
| Sparkly belt sash. |
This was the first dress I put on:
 |
| Shiny and sparkly! |
 |
| Gorgeoud back sparkles. |
This dress was already lower priced than all of the other ones in the first bridal shop we went to.
"Wait! Look at this one, this is pretty." my aunt said.Most of the dresses were not in my size so I was pretty sure the one she would show me was going to be too small. I looked at it and loved it immediately. It was my size!

I felt like I was wearing "Belle's" dress from Beauty and the Beast. It had the perfect amount of sparkles, ruffles, body and shine.
It didn't have the corset back, which I could live without! And it didn't have the heart shaped bust line. I got the dress altered with a heart shaped bust line and hemmed for $75. The dress of my dreams, at a place I never intended on going cost only $600! :)
Saturday, March 2, 2013
Melted Beads
We've seen it all over the internet on many different blogs, for many different purposes. So, I decided why not try it out for myself. Almost every crafter has pony beads or acrylic beads, and unless you want to make jewelry for youngsters there's really not much use for them. Melting them allows for much more possibilities with shape, look and overall use.
I warn you now, this project is dangerous. I personally would not endorse doing this project with a child anywhere near by. The toxins from melting acrylic beads are toxic. Many people resort to doing this project outdoors in a BBQ or a toaster oven. Personally I would suggest if you ever want to use your toaster oven, oven, or BBQ again you would need to wash it well afterwards then let the heat run for a few minutes at high heat. A lot of people use their old toaster ovens exclusively for the melting of plastics. If you do decide to do this indoors, please keep your windows open, oven fan on and ensure you do not breathe in these chemicals.
What you need:
*Acrylic Beads (Pony beads are great for this)
*Oven or Toaster oven or BBQ
*Tinfoil
*Mold (I used an old muffin tin) (I would not suggest using this item for food afterwards.)
*Drill (optional)
Step 1:
If your beads are old or reused, Soak in warm water and soap to clean them before beginning the process. (We don't want unnecessary oils)
Preheat the oven

Step 2:
Begin to organize them into your tray.

Placing them and not overlapping in the tray will allow for a flat piece of art. The more beads you put in the tray the longer it will take to melt them.
Step 3:
Cover molds with tinfoil.
I used the tinfoil to prevent most toxins from sticking to the walls of my oven.
I heated mine for 30 minutes, but it really depends on the shapes, sizes and looks that you want.
Be cautious, when taking off the tinfoil a large cloud (That I could actually see) came out and the smell was unbelievable. Moving into the other room, opening the windows, ventilator fan, Febreze... none of it worked for me. A lot of the toxins stayed inside the tinfoil and made the tinfoil stink as well. Even placing the tinfoil in the garbage was not enough.
Let the molds cool.
Step 4:
Pop your new larger beads out of the molds. (Mine popped out very easily)


Step 5:
Drill a hole in them. You can choose to wire wrap them if you do not have a drill. Or perhaps you can make smaller melted molds and create stud earrings. Or glue it to a surface.
For this project just use your imagination. Muffin tins are only step one, if you have shaped tins you can create many different shapes and sizes. Also if you have more time, you can create thicker creations.
These can be made into many neat objects, some of which are jewelry or sun catchers.
Here's what I made:

Subscribe to:
Posts (Atom)